Getting started
Installation
Install from source (recommended):
git clone https://github.com/ChuanyuXue/tsnkit
cd tsnkit
pip install -r requirements.txt
From pip:
pip install -U tsnkit
Note: Currently, the pip version might be behind in updates compared to the source installation, so it’s recommended to install from source for the latest features.
Example Usage:
Follow these steps for a basic use case:
Generate Input Data: Run the script
data/generator.pyto create a random stream set and network description. Following command uses the default arguments:python3 -m tsnkit.data.generator
This generates
1_task.csv(streamset) and 1_topo.csv (topology) in the current directory, along with dataset_logs.csv which logs the details of each streamset/topology. The detailed format of these files can be found in next section.Run the Scheduling Algorithm: Execute the scheduling algorithm using the generated input:
python3 -m tsnkit.algorithms.ls 1_task.csv 1_topo.csv
Here, `algorithms.ls`` represents one of the available scheduling algorithms. For more options, see section algorithms. The output log displays results, execution time (in seconds), and memory usage (in KB):
| time          | name   | flag   | solve_time | total_time | total_mem
| 19~14:48:54   | -      | succ   | 0.001      | 1.758      | 77072.0
The flag can be
succ(successful scheduling),fail(scheduling failed), orunknown(algorithm terminated due to time/memory constraints).If the result is succ, four configuration files are generated, each distinguished by its suffix:
–GCL.csv: Gate Control List for each network bridge.
–OFFSET.csv: Release time for each flow at the end-station.
–QUEUE.csv: Queue assignments for each flow at each hop.
–ROUTE.csv: Routing paths for each flow.
File formats are detailed in next section.
Use the following script to validate the generated configurations:
python3 -m tsnkit.simulation.tas ./1_task.csv ./
During the runtime, the script outputs logs as following to show the forwarding time of each packet on each hop:
[Listener 11]:      Flow 3 - Receive at 8012600
[Bridge (3, 2)]:    Flow 0 - Arrive at 8012600
[Bridge (2, 1)]:    Flow 0 - Arrive at 8015400
[Listener 12]:      Flow 7 - Receive at 8015400
[Bridge (1, 0)]:    Flow 0 - Arrive at 8018200
[Bridge (0, 8)]:    Flow 0 - Arrive at 8021000
[Listener 8]:       Flow 0 - Receive at 8023800
The final log indicates any potential errors and the send/receive times for each flow:
# This line shows the potential errors during simulation. Empty means no potential error detected.
[Potential Errors]: []

# This line shows the sending and receiving time of each flow.
[[[1400, 2001400, 4001400, 6001400, 8001400], [23800, 2023800, 4023800, 6023800, 8023800]],..., [15400, 2015400, 4015400, 6015400, 8015400]]]
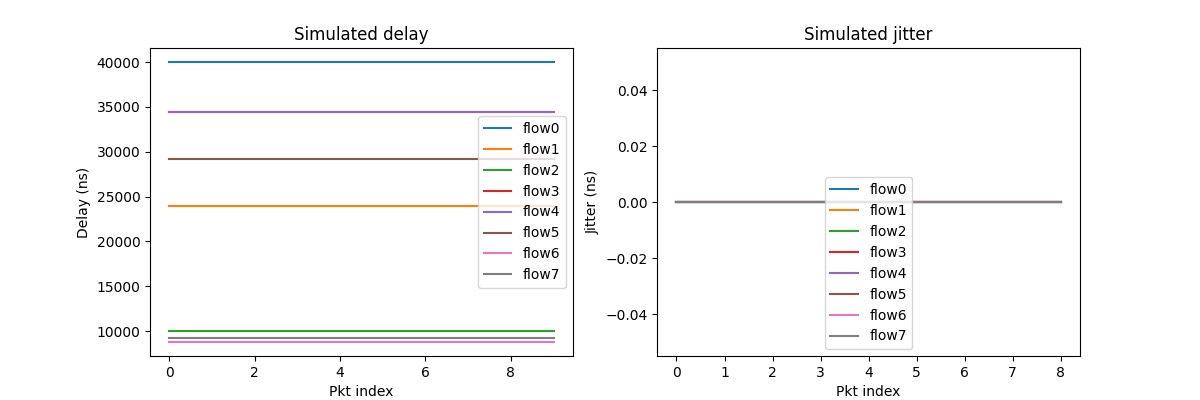
The script also draws statistics for each flow, including delay and jitter.
Dependency
Gurobi
Algorithms that require Gurobi: i_ilp, jrs_mc, jrs_nw, jrs_wa, smt_nw
Installation:
The limited version of gurobi should already be installed with your installation of tsnkit. If not, use the following command to install it:
pip install gurobipy
The limited version can solve models with a maximum of 2000 variables and 2000 constraints. Models that exceed these limits require an academic license that can be installed through the following steps.
Register for a Gurobi account and download the Gurobi Optimizer here.
Request a web license service under the tab labeled WLS Academic here. This step must be completed while connected to a university network.
After obtaining a license, follow the steps provided by this link to start using the Gurobi Optimizer.
CPLEX CP Optimizer
Algorithms that require CPLEX CP Optimizer: cp_wa, jrs_nw_l
Installation:
Installing
docplexonly provides the Python API wrapper. You need IBM CPLEX Optimization Studio (includes CP Optimizer executable) installed:Go to IBM Academic Initiative and register for academic access.
After approval, download and install CPLEX Optimization Studio.
Install the Python API:
pip install docplex
Note: Academic version currently only supports Python versions 3.10. You may need to change their setup.py to support other versions.